![]()
In my last post, I introduced a hobby drone project I have been working on recently. In that post I laid out the scope and goals of the project as a whole, without going into details about any single component. This post will start discussing the first major milestone of the project: Prometheus, a desktop application I wrote to streamline the process of building a drone system. In its final iteration, it will be a multifaceted tool capable of:
- Simulating a drone system
- Refining a drone system’s control algorithm
- Monitoring a running drone system in real-time
The first goal was to achieve monitoring capabilities. As of the tool’s most recent v0.2.1 release on Github, monitoring has been implemented. When provided with a stream of real-time drone data (position and orientation data), Prometheus visually represents the state of the drone in a 3D environment. A short demo of the tool is below:
This demo shows Prometheus receiving data from a “drone” (just an Arduino in this case) and plotting that data while also using the data to position the drone model in the 3D environment. The data in question is noisy data centered about position (0, 2, 0) and orientation (0, 0, 0).
For simplicity’s sake, I’ll be referring to Prometheus as a “simulator” throughout this post.
Interface
The 3D environment is fully navigable, allowing the user to view the room and model from any angle. There are also sets of windows along the left and right sides of the screen.
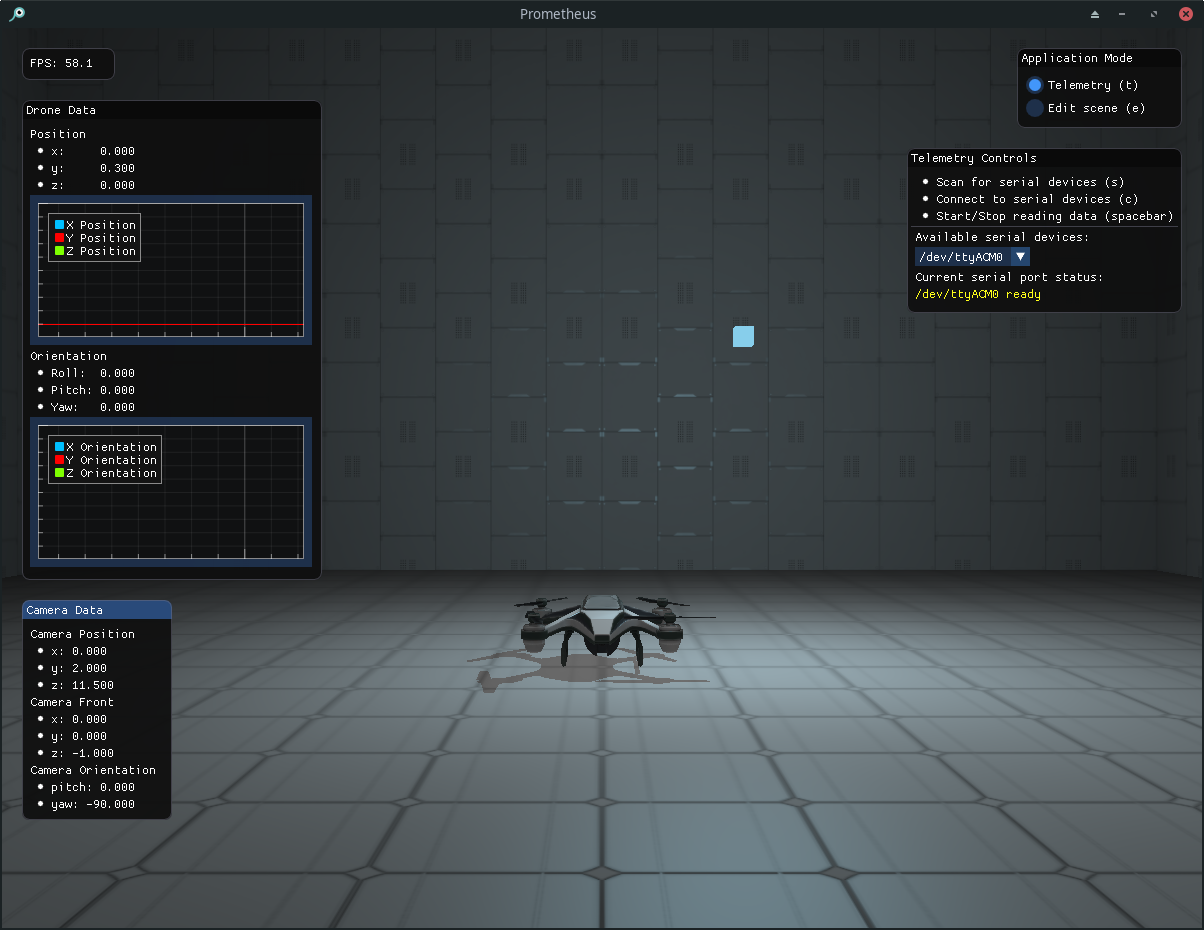
The windows along the left side of the screen display information to the user:
- FPS: Number of frames per second (which is locked at 60fps)
- Drone data: The current position and orientation values being read from the connected drone system, with plots of those values over time
- Camera data: Position and orientation data for the camera, mostly for debugging
The windows along the right are for interacting with the simulator:
- Application mode: Choosing how to run the simulator. Currently there are just two modes, telemetry and edit. Telemetry mode is for reading data from the drone, while edit mode is for repositioning the camera and drone manually
- Controls: Changes depending on the application mode. Telemetry mode, for example, allows the user to see available devices, connect to one, and ensure that the correct device is being read
The interface will change and grow in scope as simulation capabilities and other features are added to Prometheus.
Graphics
Personally, I highly value visual representation of data. If I can hold a drone in my hand, rotate it, and see that movement matched in a graphical environment, then I can easily check the correctness of the data pipeline, sensors, control algorithm, etc. Thus, this is a core requirement of the simulator.
To achieve this, I decided to implement the graphical component of the tool in OpenGL. Since I had not touched OpenGL before, I leaned heavily on LearnOpenGL, which is an excellent tutorial provided by Joey de Vries. If you are interested in learning OpenGL yourself I would highly recommend it as a resource.
I also wanted the simulator to have a fun and futuristic feel to it. Because of this, I chose to implement not just basic shape and texture rendering, but also model loading and rudimentary lighting. The small blue cube in the environment is one of these light sources.
Communication Interfaces
As mentioned in the previous section, Prometheus must be able to receive data from a drone system. I have chosen to implement this communication interface in hardware as a custom pair of wireless transmitter/receiver PCBs. The transmitter is located on the drone itself, connected to the drone’s flight computer. The receiver (the ground station) connects to a desktop via USB.
For simplicity’s sake, the ground station imitates a serial device over USB, just like an Arduino. Whenever this board receives a telemetry packet from the drone, it will forward that data to the simulator via the desktop. In the demo at the beginning of this post, the data is being generated from an Arduino UNO. For testing purposes, Arduino boards can serve as a quick substitute for the custom ground station hardware that I am building.
Serial communication was handled with the excellent LibSerial library. While the serial connections provided by the library are synchronous, Prometheus has no real need for asynchronous reads/writes so this works just fine for our purposes.
Technologies
The simulator is written in C++17 on top of raw OpenGL. Some additional third
party libraries support the graphics side of the codebase, which can be found in
the third_party
directory of
the repository. CMake is the build system of choice.
At the moment the tool is supported on Arch Linux and Ubuntu Focal (20.04 LTS). A CircleCI pipeline tests compatibility with these environments via associated Docker images. This CI pipeline may be the topic of a future post.
Other Dependencies
As mentioned, a number of dependencies are included in the project, mostly in support of the graphical functionality. Other dependencies include GLFW for windowing, DearImgui for the user interface, and Libserial for USB support.
All dependencies that need to be installed manually are detailed in the Github repository’s README.
As a side note, the tool also has a dependency on a small bounded buffer library that I wrote recently. It provides a variety of interfaces, is thread-safe, and is written in C++17. If this sounds interesting, the repository is located here. Parts 1 and 2 of the blog post I wrote about it are available as well.
Conclusion
Prometheus is officially up and running and can be used to debug control algorithms by displaying drone telemetry data, which was my goal for this release of the tool. My focus will now be shifting towards the development of the control algorithms and the drone’s flight software. More posts about these topics are soon to follow.
As always, suggestions and feedback are welcome!